How to Build a Knowledge Management Portal: An 8-Step Guide
A knowledge management portal is a centralized platform where your organization stores, organizes, and shares its knowledge.
It's the single place where employees or customers go to find answers: SOPs, product documentation, help articles, FAQs, troubleshooting guides, onboarding materials, internal policies, and process walkthroughs.
It's not the same as a shared drive. Google Drive and Dropbox hold files. A knowledge management portal adds structure, search, navigation, and governance on top of that content.
So it doesn't just store information. It makes information findable and usable.
This guide walks you through eight steps to plan, build, and launch a knowledge management portal from scratch.
Step 1: Define Your Portal's Purpose and Audience
Before you pick a tool or write a single article, answer two questions. Who is this portal for? And what specific problem does it solve?
The answers shape everything: your content, your structure, your platform choice, and how you measure success.
There are three types of knowledge management portals. These are:
1. Internal Portals Serve Your Employees
They hold onboarding docs, HR policies, IT procedures, sales playbooks, and the kind of tribal knowledge that usually lives in a senior employee's head.
The goal is to reduce repetitive questions, speed up onboarding, and prevent knowledge from walking out the door when someone leaves the company.
2. External Portals Serve Your Customers
They hold help articles, product guides, FAQs, video walkthroughs, and troubleshooting docs. The goal is self-service.
Let customers solve their own problems without contacting support. Research shows that 69% of customers prefer to resolve issues on their own before reaching out to an agent.
3. Mixed Portals Serve Both Audiences with Role-Based Access
Some content is public-facing. Some is internal-only. The goal is a single source of truth with controlled visibility so you're not maintaining two separate systems.
Once you pick your audience, set measurable goals.
Vague goals like "improve knowledge sharing" don't help. Specific goals do.
For example: reduce support ticket volume by 30%. Cut new hire onboarding from four weeks to two. Eliminate the top 10 repeat questions in your Slack channels.
Then talk to your actual users.
Interview support agents to learn which questions they answer over and over. Ask customers what they struggle to find in your current docs.
Survey employees on where they go for answers today and where they hit dead ends. This research tells you what content to build first and how to organize it.
Step 2: Audit Your Existing Knowledge
Most organizations already have knowledge. It's just scattered across too many places.
Some of it lives in Google Docs. Some in Confluence or Notion. Some in shared drives. Some in Slack threads that nobody can find anymore.
And the most valuable knowledge often lives in people's heads, undocumented.
Before you start building, you need to know what you already have.
Run a knowledge audit
Go through every tool your team uses and catalog every document, guide, FAQ, and SOP you can find.
For each piece, record the title, where it lives, who owns it, when it was last updated, and whether it's still accurate.
This sounds tedious. It is. But skipping it means you'll either migrate outdated junk into your new portal or miss content that's actually useful.
Look for three things during the audit:
- Duplicates. The same process documented in three different places with three slightly different versions. This is more common than you'd expect. Pick the best version, flag the rest for deletion.
- Outdated content. Articles that describe features or policies that have changed. Outdated docs are worse than no docs. They actively mislead people and erode trust in your portal before it even launches.
- Gaps. Recurring questions that have no documented answer. Your support tickets are the best source for finding these. If the same question comes up 15 times a month and there's no article for it, that's a gap.
Separate explicit knowledge from tacit knowledge
Explicit knowledge is the stuff that's already written down. Tacit knowledge is the stuff stuck in people's heads.
The experienced support agent who knows exactly how to handle a tricky edge case but has never documented it. The engineer who knows why a workaround exists but never wrote it up.
Tacit knowledge is the bigger risk. When that person leaves, their know-how leaves with them.
Part of your audit should identify the most critical tacit knowledge and prioritize getting it documented.
Step 3: Plan Your Content Structure and Taxonomy
Your portal's structure determines whether people can actually find things. Dump 200 articles into a tool with no hierarchy, and you've built a search engine, not a knowledge management portal.
Structure is what turns a pile of content into something navigable.
Start with top-level categories
Base these on how your audience thinks, not on how your org chart looks. Your users don't care that "Billing" falls under the "Finance Department" internally. They just want to find the article about updating their payment method.
For an external (customer-facing) portal, categories might follow user workflows:
- Getting Started
- Account Management
- Billing
- Integrations
- Troubleshooting
For an internal (employee-facing) portal, categories might map to departments or functions:
- HR & Policies
- Engineering
- Sales Playbooks
- IT & Security
- Company Handbook
Then add subcategories
Subcategories break large sections into scannable groups. Under "Integrations," you might list Slack, Zapier, API, and Webhooks as subcategories. Each one holds its own set of articles.
Build a controlled vocabulary
This means picking one term for each concept and using it consistently everywhere. If your product calls it "Workspace," don't call it "Organization" in some articles and "Account" in others. Inconsistent terminology confuses readers and breaks search results.
Tag every article with metadata
Metadata includes the product area, audience type (admin vs. end user), content type (how-to, FAQ, reference), and the date it was last reviewed. Tags make filtering and search work properly.
They also help you manage governance later because you can pull up all articles tagged to a specific feature when that feature changes.
Keep your hierarchy shallow
Three levels deep is the sweet spot: category, subcategory, article. If your readers have to click through four or five levels of menus to reach an answer, most of them will give up and contact support instead.
Step 4: Choose Your Knowledge Base Platform
Your platform is the tool where your portal lives. It's where your team writes, organizes, and publishes content. And it's what your readers interact with when they search for answers.
The right choice depends on your audience, team size, budget, and technical needs. But there are a few features that matter regardless of your situation.
What to look for:
1. An easy editor
Your content creators shouldn't need to know HTML or XML. Look for a drag-and-drop, rich-text editor that supports media embedding (images, videos, code blocks). The easier it is to create and edit content, the more likely your team will actually keep the portal updated.
2. Built-in search
Search should support autocomplete, synonym handling, and result filtering. If your platform's search can't handle basic variations in how people phrase their queries, users will hit dead ends and lose trust in the portal.
3. Customizable branding
Your portal should look like your product, not a generic template. Custom logos, colors, fonts, and a branded landing page make the portal feel like an official part of your product experience.
4. Collections and sections
The platform should let you organize content into the hierarchy you designed in Step 3. If the tool forces a flat list with no nesting, it won't support your taxonomy.
5. Role-based access
If you're running a mixed portal with both internal and external content, you need the ability to control who sees what.
Some articles should be public. Others should be visible only to logged-in employees or specific teams.
6. Analytics
You need to know what's being read, what's being searched for, and what's returning zero results. Without analytics, you're guessing at what's working and what's missing.
7. Integrations
Your portal should connect to your existing tools: support systems like Groove, Zendesk, or Intercom, chat tools, and CRM platforms.
Integrations keep the portal embedded in your team's daily workflows instead of sitting as a separate destination nobody visits.
What to avoid:
Don't default to Google Drive or Notion just because your team already uses them. These tools work for internal notes and drafts. But they fall short on search quality, navigation design, branding, analytics, and governance at scale. A dedicated knowledge base platform is built for this job. General-purpose tools are not.
Step 5: Create and Migrate Your Content
Your structure is planned. Your platform is chosen. Now it's time to fill the portal with content that's actually useful.
Start by migrating what you already have
In Step 2, you audited your existing knowledge and flagged what's worth keeping. Now pull those docs into your new platform.
Most knowledge base tools support importing from Groove, Zendesk, Intercom, Confluence, Notion, and Google Docs. This saves you from rewriting everything from scratch.
But you want to only bring over content that passed your audit. Importing 300 articles that include 100 outdated ones defeats the purpose of building a new portal.
Restructure as you migrate
Drop each article into the correct category and subcategory from the taxonomy you built in Step 3. Update titles so they're clear and searchable.
Replace internal jargon with the language your readers actually use. An article titled "CS Escalation Flow v2 - FINAL" might become "How to Escalate a Customer Issue."
Fill the gaps you identified
Your audit surfaced recurring questions with no documented answer. Now is the time to write those articles. Prioritize by impact.
Start with the topics that generate the most support tickets or the questions new hires ask most often. These high-impact articles deliver the fastest return on your portal investment.
Use templates for every content type
Not every article follows the same format. How-to articles need numbered steps. FAQ articles need clear question-and-answer pairs. Troubleshooting articles should start with the symptom and end with the fix. Reference articles should be structured for quick scanning, not linear reading.
Create a template for each type.
When a writer starts a new article, they open the template and fill it in. They don't waste time deciding what sections to include or what order to follow. Templates keep your portal consistent even when multiple people contribute.
Add visuals
Screenshots, annotated images, and short video walkthroughs make complex processes much easier to follow. A 90-second screen recording of a setup flow can replace 500 words of step-by-step text. For product documentation especially, showing beats telling.
Write for scanners
Most people don't read help articles from top to bottom. They land on the page, scan for the answer, and leave. Write for that behavior. Use clear headings that describe what each section covers. Keep paragraphs short. Bold the key terms and actions so the answer jumps off the page.
Step 6: Set Up Search and Navigation
You can have the best content in the world. But if people can't find it, it's useless.
Search and navigation are the two systems that make your knowledge management portal functional.
Search serves the people who know what they're looking for. Navigation serves the people who want to browse.
Search configuration
Make the search bar the most prominent element on your portal's landing page. If users have to scroll or click through a menu to find it, it's in the wrong place. Search should be front and center.
Configure autocomplete so suggestions appear as users type. This helps people find the right article faster and reduces the chance of misspelled queries returning empty results.
Set up synonyms. Your product might call a feature "Workspace." But users might search for "Organization," "Team," or "Account." All of those terms should return the same results. Without synonym mapping, your search will fail for queries that are technically correct but don't match your exact labels.
Most importantly, track failed searches. These are queries that return zero results.
Every failed search tells you one of two things: either the content doesn't exist yet (a gap you need to fill), or it exists but the title and tags don't match what users are typing (a labeling problem you need to fix).
Navigation design
Your portal's landing page should show your top-level categories at a glance. Users who prefer browsing over searching need a clear starting point.
Display your categories as cards, icons, or a sidebar menu. Whatever format you choose, make sure every category is visible without scrolling.
Add breadcrumbs to every article.
A breadcrumb trail like Home > Integrations > Slack > Connect Slack to Your Workspace tells the reader exactly where they are. It also lets them jump to any parent category with one click.
Include "related articles" links at the bottom of each page. These keep users inside the portal instead of forcing them back to the main menu every time they need another answer.
For customer-facing portals, always include an escape hatch. If the article doesn't solve the problem, a "Contact Support" button should be one click away. Don't bury it.
A portal that traps users without a path to human help creates more frustration than it solves.
Step 7: Establish Content Governance
This is the step most teams skip. And it's the reason most knowledge management portals fail within a year.
A portal without governance becomes a graveyard. Articles go stale. New features ship without doc updates. Policies change but the old article stays live.
Users start seeing wrong information, stop trusting the portal, and go back to asking questions in Slack.
Governance prevents this. It's the system that keeps your content accurate, current, and trustworthy over time.
Assign content owners
Every article needs a named person who is responsible for keeping it accurate. When a product feature changes, the owner updates the doc.
When a policy is revised, the owner edits the article. No owner means no accountability. And no accountability means the article will quietly rot until someone follows it and hits a dead end.
Ownership doesn't mean that one person writes everything. It means one person is accountable for each article's accuracy. They might delegate the writing, but they own the outcome.
Set review cycles
Schedule regular content reviews. For most teams, quarterly reviews work well. For fast-moving products that ship updates every sprint, monthly reviews on high-traffic articles make more sense.
Use your platform's built-in review reminders or expiration dates to automate this. When an article's review date arrives, the owner gets a notification. They verify the content is still accurate, make updates if needed, and reset the review timer.
Define an approval workflow
Decide who can publish content directly and who needs a review first. For small teams, a single reviewer might be enough. A writer drafts the article, one person reviews it, and it goes live.
For larger teams or industries with compliance requirements, you may need a multi-step pipeline: draft, review, approve, publish. The key is to keep it lightweight enough that it doesn't slow down content production.
Governance that's too heavy creates bottlenecks, and bottlenecks lead to teams bypassing the system entirely.
Use version control
Track changes to every article. If an update introduces an error, you need to roll back to the previous version quickly. Most knowledge base platforms handle versioning automatically. Make sure yours does before you start publishing.
Retire outdated content
Deleting or archiving old articles is just as important as creating new ones. An outdated troubleshooting guide that references a feature that no longer exists actively damages trust.
If a customer follows those instructions and gets stuck, they won't try the portal again.
Set a rule: when a feature is deprecated or a process changes, the associated articles get updated or archived within the same release cycle. Don't let old content linger.
Step 8: Launch, Promote, and Drive Adoption
Building the portal is half the work. Getting people to actually use it is the other half.
A portal that nobody visits is just a content library with zero readers. Adoption requires deliberate effort, especially in the first few weeks.
Launching an internal portal
Announce it through the channels your team already uses. Post in Slack. Send an email. Bring it up in the next all-hands meeting. Don't just announce it once and assume everyone saw it. Repeat the message across multiple channels over the first two weeks.
Then embed the portal into existing workflows. Link to it from your employee onboarding checklist. Add it to your ticketing system's internal knowledge panel.
When a new hire asks a question, point them to the portal article instead of typing out the answer. When a manager gets a repeat question, they share the link instead of explaining from memory.
This builds the habit of portal-first. Over time, the team learns that the portal is the default place for answers.
Track adoption metrics from day one. Monitor unique visitors, repeat visitors, search queries, and time on page. If usage spikes at launch and drops the following week, something is wrong. Either the content isn't solving real problems, or people can't find what they need.
Launching an external portal
Surface the portal where your customers already are. Link to relevant articles from your product's UI, especially in onboarding flows, settings pages, and error messages. Add the portal to your website's main navigation and footer.
Include article links in your support email auto-replies. When a customer submits a ticket, the auto-reply can suggest relevant articles before an agent responds.
Do the same with your chatbot. If you use live chat or a help widget, configure it to suggest portal articles before routing to a human.
Optimize your articles for SEO. Many customers search Google first, not your portal. If your articles rank for the queries your customers are typing, you capture that traffic before they ever submit a support ticket.
Use descriptive titles, include relevant keywords naturally, and structure articles with clear headings.
Collect feedback from day one
Add a "Was this helpful?" prompt to every article. This gives you a direct signal on which articles are working and which need improvement. Track thumbs-down ratings and prioritize fixing those articles first.
Open a feedback channel where users can flag errors, suggest improvements, or request new topics. This could be as simple as a "Report an issue" link at the bottom of each article.
User feedback is one of your best sources for ongoing content improvement.
How InstantDocs Helps You Build and Run Your Knowledge Management Portal
You now have a complete process for building a knowledge management portal. But there's a gap between knowing the steps and actually executing them.
Writing hundreds of articles takes weeks. Spotting content gaps requires combing through support tickets manually.
Keeping everything current means reviewing every article on a regular cycle. These are the tasks that cause most portals to stall after launch.
InstantDocs is an AI-powered knowledge base platform built to handle exactly these bottlenecks. Here's how it maps to the process you just learned.
AI Recorder: Produce Help Docs Without Writing From Scratch
In Step 5, we talked about creating content and including visuals. Both take time.
Writing a step-by-step article with screenshots can take an hour or more per article. Multiply that by 100 articles, and you're looking at months of production work.
InstantDocs' AI Recorder changes that math.
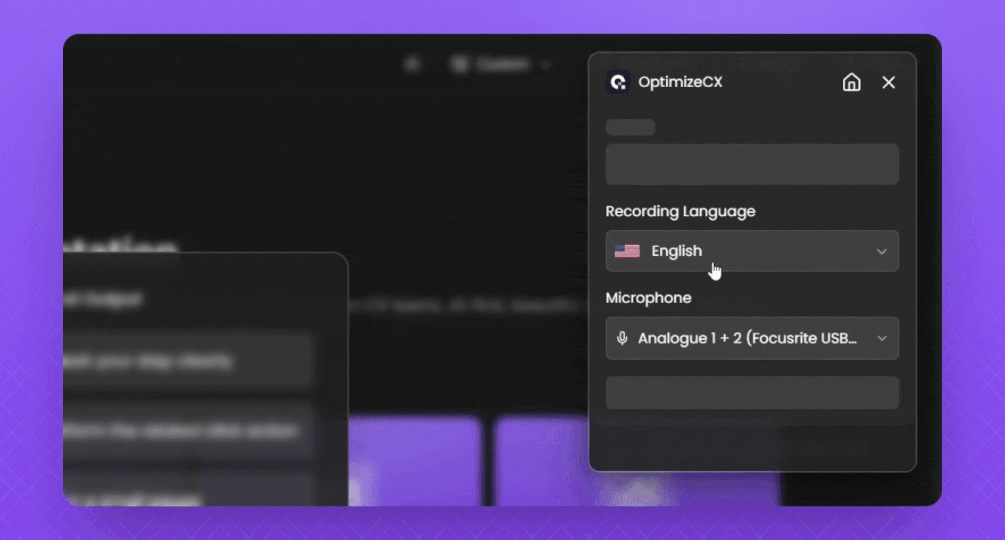
It's a Chrome extension that lets you record a screen walkthrough of any process in your product. After you stop recording, it automatically:
- Extracts key screenshots from the video
- Writes a full transcript and turns it into step-by-step instructions
- Adds a studio-quality voiceover that replaces your original audio
- Syncs the voiceover with the video for a polished final output
You also get a built-in video editor to adjust the script, fix sync issues, swap intro and outro templates, and add on-screen elements.
What used to take hours per article now takes a recording session and a quick review. For teams that need to fill a portal with dozens of how-to articles, this removes the biggest production bottleneck.
Knowledge Gap: Find Missing and Outdated Content Automatically
In Step 2, we covered the knowledge audit. In Step 7, we covered governance and review cycles. Both are critical. Both are also manual, repetitive, and easy to let slip.
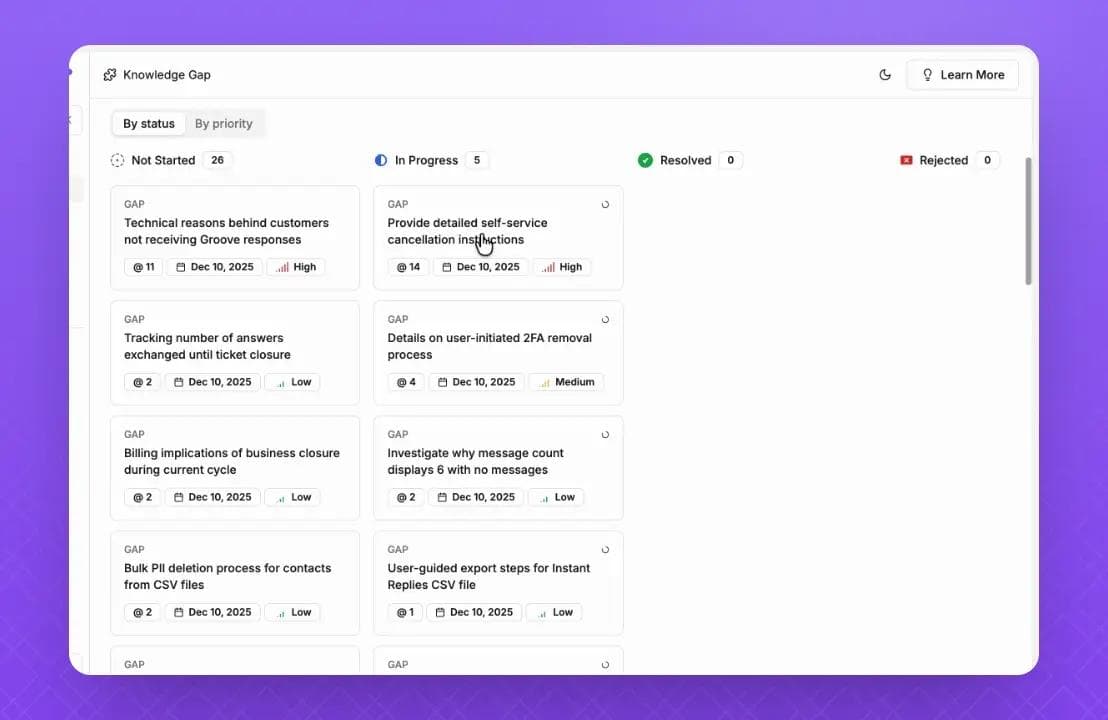
InstantDocs' Knowledge Gap feature handles both tasks continuously. It analyzes your incoming support tickets and cross-references them against your existing portal content. Then it flags two types of problems:
- Missing docs. A question keeps showing up in your support queue, but no article exists to answer it. Knowledge Gap shows you the recurring tickets and their summaries so you can see exactly what needs to be written.
- Outdated docs. An article exists, but it no longer matches the current product. Customers are filing tickets about information that's wrong or incomplete. Knowledge Gap flags the article and the supporting tickets as evidence.
For each gap, you can auto-generate a new article or update the existing one. Review it, edit if needed, and publish.
Instead of scheduling quarterly audits and hoping nothing slips through, you get a continuous feed of what's missing and what's stale.
Notion-Like Editor and Branded Knowledge Base
In Step 4, we talked about choosing a platform with an easy editor and customizable branding. InstantDocs delivers both.
The editor works like Notion. You build articles with drag-and-drop blocks, rich text, embedded media, and flexible layouts.
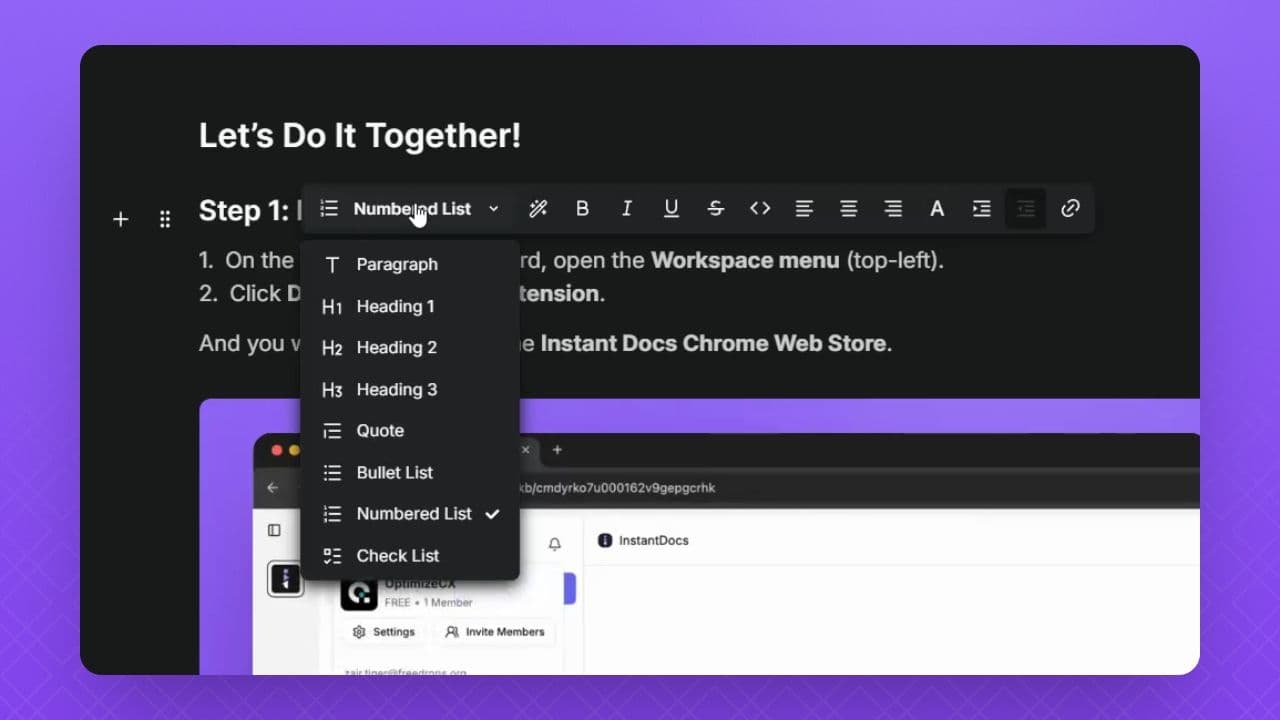
Content is organized into collections and sections that mirror the taxonomy you designed in Step 3.
Your knowledge base gets its own customizable landing page. You control the branding, layout, and category display. The result is a portal that looks like part of your product, not a third-party tool bolted onto your website.
Import From Existing Tools
In Step 5, we covered migrating content from your current tools. InstantDocs supports importing from Groove, Zendesk, Intercom, Confluence, Notion, Crisp, and Google Docs.
Connect your existing platform, pull in your articles, and reorganize them under your new structure.
This means you can move to a better portal without starting your content library from zero. Migrate what's worth keeping, restructure it under your new taxonomy, and fill the gaps with new content.
SaaS teams are already using this modern workflow to achieve real results:
- Conzent ApS cut their documentation creation time by 90%.
- Busable saved over 93 hours by plugging InstantDocs directly into their development workflow.
- C2Keep launched a clean, branded knowledge base in days, not months.
So, are you ready to transform your knowledge management process from reactive to proactive?
Instantly build support docs that delight.
Book a demo